

|
Product Details:
|
| Name: | Spring Support | Package: | Plywood |
|---|---|---|---|
| Brand: | Kiande | Certification: | ISO9001 |
| Model: | KD-TH | Usage: | For Plug In Box |
| MOQ: | 1000PCS | ||
| Highlight: | 120mm Busbar Accessories,Kiande Busbar Accessories,120mm Spring Support |
||
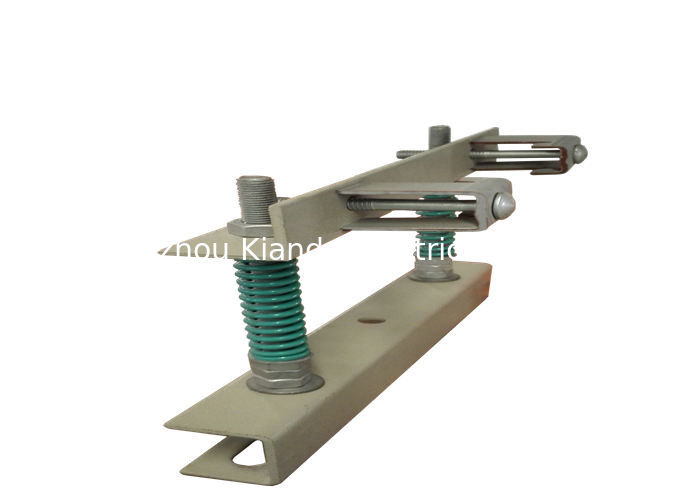
Spring Support Busbar Accessories For Busbar Installation
![]()
![]()
| No. | Item | Specification | Parameters |
| 1 | Spring support | 60*40*5mm | |
| 60*40*3mm | |||
| 2 | Spring | 17L120 | L=120mm |
| 3 | Double headed bolt | M10*230mm | |
| 4 | Support | Vertical / flatwise |
Installation Instructions for mounting spring hanger
1 Fit the Spring Hanger to the ‘U’ clamp already fitted to both side of the bustrunking (Rising Mains)..
2 Remove nut A from Rigid hanger assembly, and pass the M16 bolt thru the holes in the ‘C’ channel already grouted
on the floor/wall
3 By virtue of bustrunking weight the spring will compress and creates a gap between nut ‘C’ and L support. Tighten nut
‘C’ by hand so as to eliminate the gap.
4 Adjust nut B on both sides of bustrunking until it reaches desired level for fixing joint with lower bustrunking. Ensure
that nut B is adjusted equally on both sides to install bustrunking vertically straight.
5 Lock nut A from lower end of bolt to the ‘C’ channel.
6 Repeat step #1,2,3,4,5 for subsequent bustrunking.
7. Loosen nut C to allow enough gap for spring to expand under thermal conditions after complete installation.
Contact Person: Tina
Tel: +8618115561910
Fax: 86-512-62761477-807